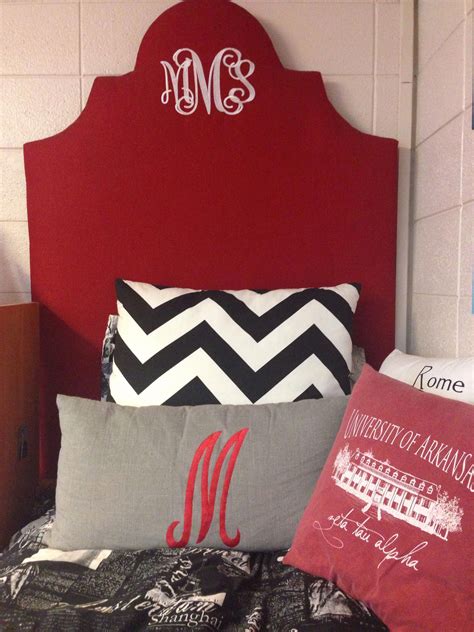
Moving into a dorm room can be an exciting and daunting experience. One of the challenges you may face is decorating your new space on a tight budget. A headboard is a great way to add personality and style to your room, but store-bought headboards can be expensive. That’s where DIY comes in! With a little creativity and some affordable materials, you can create a custom headboard that perfectly reflects your style.

Why a DIY Dorm Headboard Matters
- Customization: A DIY headboard allows you to create a unique design that matches your personal style and the decor of your room.
- Budget-friendly: DIY headboards are significantly cheaper than store-bought options, saving you money on dorm essentials.
- Expressing Creativity: Building your own headboard is a fun and rewarding way to express your creativity and make your dorm room feel like home.
Benefits of a DIY Dorm Headboard
- Adds Style and Personality: A headboard is a focal point of your dorm room and can instantly elevate its style.
- Provides a Comfortable Backrest: A padded headboard provides a comfortable and supportive backrest for reading, watching TV, or studying.
- Insulates the Wall: A headboard can help insulate your wall, keeping your head warm and reducing cold drafts.
- Hides Unsightly Cords: A headboard can hide unsightly cords and cables, creating a more organized and visually appealing space.
Common Mistakes to Avoid
- Not Measuring Correctly: Measure your bed carefully before cutting any materials to ensure a perfect fit.
- Using Cheap Materials: Choose durable materials that will withstand everyday use and last throughout your college experience.
- Overcrowding the Design: Keep your design simple and avoid adding too many elements or decorations to avoid a cluttered look.
- Not Securing the Headboard Properly: Make sure your headboard is securely attached to your bed frame to prevent it from falling or shifting.
- Ignoring the Weight: Consider the weight of your headboard when choosing materials and mounting it to ensure it is safe and stable.
Creating Your Own DIY Dorm Headboard
The possibilities for creating a DIY dorm headboard are endless. Here are some creative ideas to inspire you:
- Fabric-Covered Headboard: Use upholstered fabric or a quilt to cover a plywood base for a cozy and stylish headboard.
- Corkboard Headboard: Use a large piece of corkboard as the base and pin photos, postcards, and artwork to create a personalized and functional headboard.
- Wooden Pallet Headboard: Reclaim wooden pallets and paint or stain them to create a rustic and industrial-chic headboard.
- Tapestry Headboard: Hang a tapestry or wall hanging over your bed as a headboard for a bohemian and eclectic touch.
- Wall-Mounted Headboard: Install a piece of plywood or MDF on the wall behind your bed and paint it or decorate it with wallpaper or fabric.
Materials and Tools You’ll Need
The specific materials and tools you need for your DIY dorm headboard will vary depending on the design you choose. Here is a general list of common items:
Materials:
- Plywood or MDF (for a sturdy base)
- Fabric, upholstery, or quilt (for a padded or covered headboard)
- Paint or stain
- Screws or nails
- Screws or bolts (to mount the headboard to the bed frame)
Tools:
- Saw
- Drill
- Measuring tape
- Screwdriver or drill
- Hammer
- Staple gun (for fabric or upholstery)
Step-by-Step Instructions
1. Plan and Measure
Measure your bed and decide on the size and shape of your headboard. Sketch out your design and gather all necessary materials and tools.
2. Cut and Assemble the Base
Cut the plywood or MDF to the desired size and shape. Assemble the pieces using screws or nails, creating a sturdy base for the headboard.
3. Add Padding or Covering
If desired, add padding or cover the base with fabric or upholstery. Staple or tack the fabric or upholstery to the base, ensuring a snug and secure fit.
4. Paint or Stain
Paint or stain the headboard and allow it to dry completely. If using a plywood base, consider priming it first for better paint adhesion.
5. Mount the Headboard
Attach the headboard to the bed frame using screws or bolts. Ensure it is securely fastened to prevent it from falling or shifting.
Other Creative Ideas
1. Gallery Wall Headboard: Create a gallery wall headboard by hanging a group of small frames or shelves on the wall above your bed, displaying artwork, photos, or other decorative items.
2. Mirror Headboard: Install a large mirror on the wall behind your bed to reflect light and create an illusion of space. Use a framed mirror or add decorative molding for a more sophisticated look.
3. Neon Sign Headboard: Hang a neon sign with a motivational message or your favorite quote above your bed for a vibrant and eye-catching headboard.
4. Pegboard Headboard: Mount a large piece of pegboard on the wall behind your bed and use hooks and shelves to store books, headphones, and other dorm room essentials.
Conclusion
Creating a DIY dorm headboard is a budget-friendly and rewarding way to personalize your room and add a touch of style. With a little creativity and the right materials, you can craft a unique headboard that perfectly reflects your personality and complements the decor of your dorm room. So, don’t hesitate to dive into the world of DIY and create a custom headboard that will make your dorm room feel like home.
Budget
DIY dorm headboards can be made for a fraction of the cost of store-bought options. The average cost for a DIY headboard can range from $20 to $100, depending on the materials and design you choose.
Time
Creating a DIY dorm headboard can take anywhere from a few hours to a day or two, depending on the complexity of the design. Set aside enough time to complete your project without feeling rushed.
Safety
Always prioritize safety when working with tools and materials. Wear appropriate safety gear, such as gloves and safety glasses, and follow all instructions carefully. Ensure your headboard is securely mounted to prevent it from falling or shifting and posing a hazard.
Sustainability
Consider using sustainable materials for your DIY dorm headboard, such as reclaimed wood or recycled fabrics. This helps reduce waste and promotes environmental responsibility.
Table 1: Common Headboard Materials and Price Range
| Material | Price Range |
|---|---|
| Plywood | $20 – $30 |
| MDF | $25 – $35 |
| Fabric | $10 – $50 per yard |
| Upholstery | $15-$75 per yard |
| Wooden pallets | Free – $20 |
| Corkboard | $10 – $20 per sheet |
Table 2: DIY Headboard Design Ideas
| Design | Materials |
|---|---|
| Fabric-covered | Plywood, fabric, upholstery, or quilt |
| Corkboard | Large piece of corkboard, photos, postcards, and artwork |
| Wooden pallet | Reclaimed wooden pallets, paint or stain |
| Tapestry | Tapestry or wall hanging |
| Wall-mounted | Plywood or MDF, paint or wallpaper |
Table 3: Essential Tools for DIY Headboard Projects
| Tool | Purpose |
|---|---|
| Saw | Cut plywood or MDF |
| Drill | Drill holes for screws or bolts |
| Measuring tape | Measure and mark the headboard |
| Screwdriver or drill | Insert screws or bolts |
| Hammer | Drive nails |
| Staple gun | Staple fabric or upholstery |
Table 4: Troubleshooting Common Headboard Issues
| Issue | Solution |
|---|---|
| Headboard is too high or low | Measure the headboard carefully and adjust the height accordingly |
| Headboard is not sturdy enough | Use thicker materials or reinforce the base with additional supports |
| Fabric is wrinkled or loose | Iron the fabric or pull it taut and staple it securely |
| Headboard is unstable | Check the mounting hardware and ensure the headboard is securely attached to the bed frame |
| Headboard is damaged | Repair any damage promptly to prevent further issues |
