Introduction
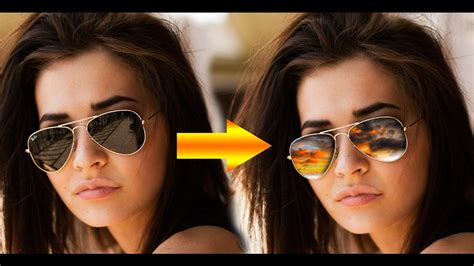
Adding sunglasses to photos can instantly elevate the style and mood of your images. Whether you’re capturing memories of a sunny day or creating a fashionable profile picture, sunglasses can add a touch of sophistication or coolness to your shots. With the advent of advanced image editing tools, adding sunglasses has become easier than ever before. This comprehensive guide will provide you with step-by-step instructions and expert tips to help you add sunglasses to any photo effortlessly.
1. Choose an Image Editing Tool
There are numerous image editing tools available, both online and offline. Some popular options include Adobe Photoshop, GIMP, Canva, and Pixlr. Choose a tool that aligns with your needs and skill level.
2. Import the Image
Once you have selected an image editing tool, import the photo to which you want to add sunglasses. This can typically be done by dragging and dropping the file into the program or by using the “File” menu.
3. Create a New Layer
To preserve the original image, create a new layer for the sunglasses. In most image editing tools, this can be done by clicking the “New” button and selecting “Layer.”
4. Trace the Sunglasses
Using a pen or brush tool, trace the outline of the sunglasses you want to add. You can use an existing photograph or create your own custom design. Ensure that the shape and proportions of the sunglasses match the image you’re editing.
5. Fill in the Lenses
Once the sunglasses are traced, fill in the lenses with a solid color or gradient. The color you choose will depend on the desired effect. Darker shades, such as black or brown, create a more dramatic look, while lighter shades, such as white or gray, provide a more subtle effect.
6. Adjust the Transparency
To make the sunglasses appear more realistic, adjust the transparency of the new layer. This will allow the underlying image to show through, creating the illusion of sunglasses being worn.
7. Adjust the Size and Position
Use the transform tools to resize and position the sunglasses to fit the face in the image. Experiment with different sizes and angles until you find the perfect look.
8. Save the Image
Once you’re satisfied with the result, save the image in the desired format. Common formats include JPEG, PNG, and TIFF.
Using Layers
Layers allow you to add multiple elements to your photo without affecting the original image. This technique is particularly useful for creating complex sunglasses designs or adding multiple pairs of sunglasses to a single image.
Creating Custom Shapes
Don’t limit yourself to using existing sunglasses designs. With image editing tools, you can create your own custom shapes for truly unique sunglasses. This is a great way to match the sunglasses to the style of your photo or to create a futuristic or mythical look.
Adding Reflections
Reflections on lenses add depth and realism to sunglasses. To create reflections, use a brush tool to add white or light-colored highlights around the edges of the lenses. Adjust the opacity to create a subtle or intense reflection effect.
Common Mistakes to Avoid
Oversized Sunglasses
Avoid using sunglasses that are too large for the face. This can create an unnatural and comical look.
Incorrect Alignment
Make sure the sunglasses are aligned with the face and follow the contours of the eye sockets. Misaligned sunglasses can look awkward and distracting.
Dark Lenses
While dark lenses can create a dramatic effect, they can also mask the eyes and make the image appear flat. Consider using lighter lenses for a more natural look.
FAQs
Q: What are the best image editing tools for adding sunglasses to photos?
A: Popular options include Adobe Photoshop, GIMP, Canva, and Pixlr.
Q: Can I add sunglasses to any photo?
A: Yes, you can add sunglasses to any photo, regardless of the subject or background.
Q: How realistic can I make the sunglasses appear?
A: With proper techniques and attention to detail, you can create highly realistic sunglasses that blend seamlessly with the image.
Q: Can I add multiple pairs of sunglasses to a single photo?
A: Yes, using layers, you can add multiple pairs of sunglasses to a single photo, allowing for creative and unique compositions.
Fashion and Beauty
Sunglasses have become an essential fashion accessory, and adding them to photos can enhance the style and appeal of your images. Whether you’re showcasing a new outfit or creating a stylish profile picture, sunglasses can add a touch of glamour or sophistication to your look.
Storytelling
Sunglasses can be used to convey emotions and moods in storytelling. For example, dark and opaque sunglasses may indicate mystery or intrigue, while clear and tinted sunglasses may suggest openness or confidence.
Photojournalism
In photojournalism, sunglasses can help protect the identities of subjects while still capturing their expressions and body language. This technique is often used in street photography or when photographing people in sensitive or dangerous situations.
Adding sunglasses to photos is a versatile and creative technique that can transform your images, whether you’re capturing memories, expressing your style, or crafting compelling narratives. With practice and the right techniques, you can seamlessly integrate sunglasses into your photos, creating visually stunning and impactful images. Experiment with different designs, sizes, and colors to find what works best for your photographic needs.